How to run
Runtime Parameters
Parameter |
Description |
|---|---|
|
show help message |
|
Record behavior status over time to |
|
Record how fast the tree actually ticked, and how long each behavior's calls took, to |
|
(For debugging) print internal debugging output |
|
Write dot files of resulting py-tree ( |
|
(For debugging) Produce tree output of parsed scenario |
|
Parse and resolve scenario, but do not execute |
|
Directory for output (e.g. test results) |
|
Parameter definition used to override default scenario parameter definitions. See Override scenario parameters for details. |
|
Create a template yaml file for overriding scenario parameters. The file will be named like specified by |
|
(For debugging) Show current state of py tree |
|
Command or script to run after scenario execution. The command will be called as |
|
Duration in seconds between behavior tree ticks (default: |
|
Step-based simulation interface to use. The value must be in |
|
Only with |
|
When more than one scenario is executed (multiple |
Run locally with ROS2
First, build the packages:
colcon build --packages-up-to scenario_execution_gazebo
source install/setup.bash
To run an osc-file with ROS2:
ros2 run scenario_execution_ros scenario_execution_ros $(PATH_TO_SCENARIO_FILE)
To log the current state of the behavior tree during execution, add the -t flag as an argument and run it again:
ros2 run scenario_execution_ros scenario_execution_ros $(PATH_TO_SCENARIO_FILE) -t
Additional parameters are describe in section Runtime Parameters.
Run as standalone Python package without ROS2
After installing scenario_execution using pip (see Installation with pip as standalone Python package), you can execute a scenario with the following command
scenario_execution $(PATH_TO_SCENARIO_FILE)
To log the current state of the behavior tree during execution, add the -t flag as an argument and run it again:
scenario_execution $(PATH_TO_SCENARIO_FILE) -t
Additional parameters are describe in section Runtime Parameters.
Run with Development Container inside Visual Studio Code
Prerequisites
If not already installed, install the docker engine on your system according to the installation instructions or, if you need GPU support, follow the nvidia installation instructions.
Make sure you follow the post installation steps.
To make sure, that the docker daemon is properly set up, run
docker run hello-world
Make sure you have installed the necessary Visual Studio Code extensions, namely the docker extension as well as the Dev Container extension.
Open Scenario Execution in Development Container
First, build the packages:
colcon build
Now, open the root folder of the scenario execution repository in Visual Studio Code by running
code /path/to/scenario_execution
in a terminal.
Make sure, that your ROS_DOMAIN_ID is properly set in the terminal you start Visual Studio Code from.
Then, click the blue item in the lower left corner
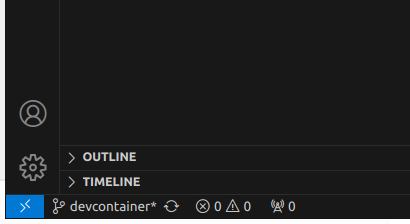
Afterwards, select "Reopen in Container " in the Selection Window inside Visual Studio Code
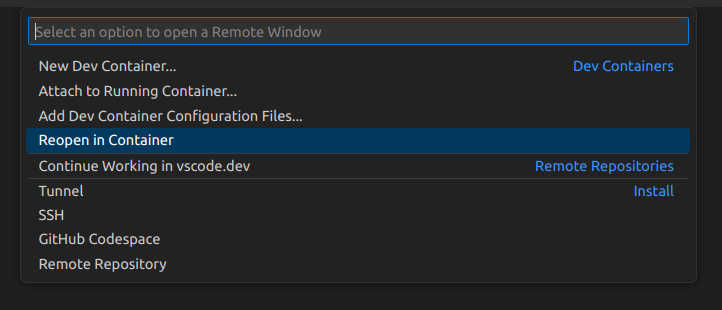
Now Visual Studio Code should build the development container and open your current working directory inside the container after it successfully built the image. If you now open a terminal inside Visual Studio Code, you can run and test your development safely inside the development container by running any of the examples (see Tutorials for further details).
Once you are done, you can cancel the remote connection, by again clicking on the blue item in the lower left corner and select "Close Remote Connection"
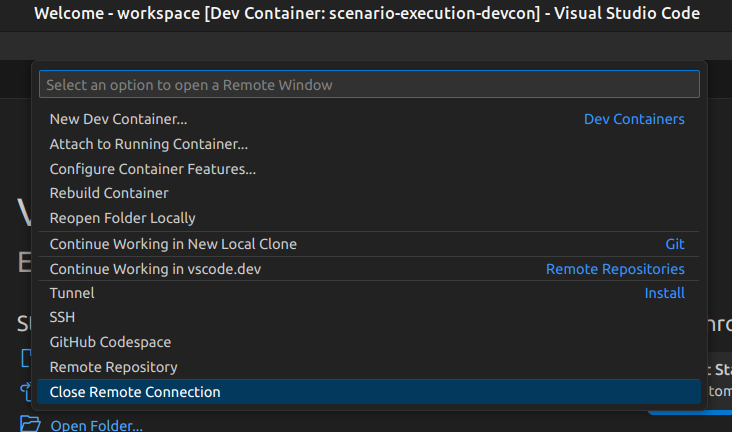
Visualize Scenario with PyTrees ROS Viewer
Before getting started, ensure that the PyQt5 version 5.14 Python library is installed. You can check PyQt5 version using the following command:
pip freeze | grep -i pyqt
If any PyQt5 libraries are detected, it's recommended to uninstall them to avoid conflicts:
pip3 uninstall PyQt5 PyQt5-Qt5 PyQt5-sip PyQtWebEngine PyQtWebEngine-Qt5
Additionally, if the default PyQtWebEngine is present, remove it using:
sudo apt remove python3-pyqt5.qtwebengine
Next, install PyQt and PyQtWebEngine version 5.14:
pip install PyQt5==5.14
pip install PyQtWebEngine==5.14
Once PyQt is set up, clone the py_trees_ros_viewer repository:
git clone git@github.com:splintered-reality/py_trees_ros_viewer.git
After cloning, build the package using colcon build and source the workspace.
Now, to open the viewer, execute the following command:
py-trees-tree-viewer --no-sandbox
Finally, in a separate terminal, run the scenario file to visualize the behavior tree.
Example:
ros2 run scenario_execution_ros scenario_execution_ros =examples/example_scenario/hello_world.osc
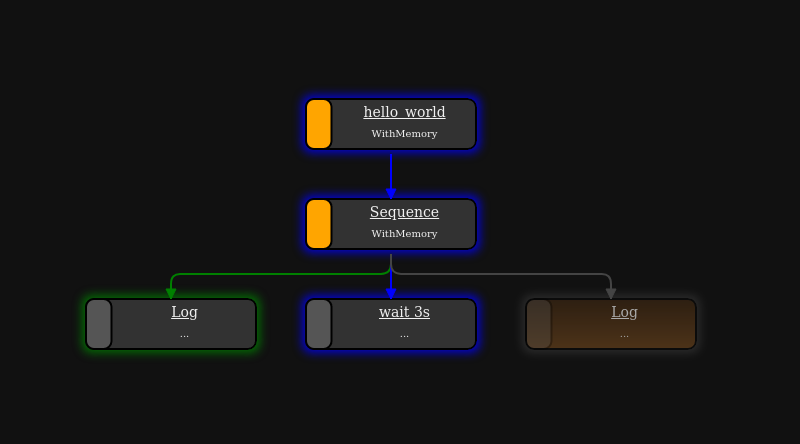
Please note that this method has been tested on Ubuntu 22.04. If you are using any other distribution, please ensure that PyQtEngine works on your machine and render web pages correctly.
Scenario Coverage
The scenario_execution_coverage package provides the ability to run variations of a scenario from a single scenario definition. It offers a fast and efficient method to test scenario with different attribute values, streamlining the development and testing process.
Below are the steps to run a scenario using scenario_execution_coverage..
First, build the packages:
colcon build --packages-up-to scenario_execution_coverage
source install/setup.bash
Then, generate the scenario files for each variation of scenario using the scenario_variation executable, you can pass your own custom scenario as an input. For this exercise, we will use a scenario present in examples/example_scenario_variation/.
scenario_variation examples/example_scenario_variation/example_scenario_variation.osc
This will save scenario variation files with the .sce extension in the out folder within the current working directory.
To execute the generated scenario variations, run the scenario_batch_execution executable. This command will process all scenarios files present in the out folder and execute them sequentially.
scenario_batch_execution -i out -o scenario_output -- ros2 run scenario_execution_ros scenario_execution_ros {SCENARIO} --output-dir {OUTPUT_DIR}
above command requires three arguments.
-i: directory where the scenario files.sceare stored
-o: directory where the outputlogandxmlfiles will be saved (for each scenario file within a separate folder)
-- ros2 run scenario_execution_ros scenario_execution_ros {SCENARIO} --output-dir {OUTPUT_DIR}: launch command to launch scenarios
Note
scenario_batch_execution can be used for any scenario-files, not only those generated by scenario_variation.
The return code of scenario_batch_execution is 0 if all tested scenarios succeeded. The output can be found within the specified output-folder:
<output_folder>/
   text.xml        # overall test result (summary of all tested scenarios)
   <scenario1>/    # directory for scenario
      test.xml     # test result of scenario
      log.txt      # log output of scenario execution
      ...          # other files generated by scenario execution run (e.g. rosbag)
Note
scenario_batch_execution creates a junit xml compatible file that can easily be integrated into a CI pipeline. An example can be found here: .github/workflows/test_build.yml
Multiple scenarios per file
A single .osc file can contain any number of scenario declarations.
Scenarios are executed sequentially in the order they appear in the file.
scenario first_scenario:
    object_goal_pos: position_2d = position_2d(x: 0.6m, y: 0.6m)
    do serial:
        wait_for_simulation_end()

scenario second_scenario:
    object_goal_pos: position_2d = position_2d(x: 0.3m, y: 0.6m)
    do serial:
        wait_for_simulation_end()
When --simulation is used the simulation environment is kept alive across
scenarios: setup() and shutdown() are called once for the whole file,
while reset() (together with a clock reset) is called before each
individual scenario. This avoids the overhead of restarting the physics
engine between runs.
Each scenario result appears as a separate <testcase> in test.xml.
Override scenario parameters
To override scenario parameters, specify the required parameters within a yaml file and use the command-line parameter --scenario-parameter-file.
Let's look at the following example scenario my_scenario.osc with the parameter my_base_param and my_struct_param.
import osc.helpers

scenario my_scenario:
    my_base_param: string = "default value"
    my_struct_param: position_3d
    do serial:
        log(my_base_param)
        log(my_struct_param)
To override the parameter, the following yaml file overrides.yaml can be used.
my_scenario:
  my_base_param: "my_val"
  my_struct_param:
    x: 1.0
    y: 2.0
    z: 0.0
The following command executes the scenario with the defined override.
ros2 run scenario_execution_ros scenario_execution_ros --scenario-parameter-file overrides.yaml my_scenario.osc
If physical literals get overridden, the values are expected in SI base units: For example specify value in meter (e.g. 42.0) for length; specify value in seconds for time.
An initial override template file can be created using the command-line parameter --create-scenario-parameter-file-template. This will create a yaml file named by --scenario-parameter-file in the current working directory.
Multi-document YAML — cross-product runs
A --scenario-parameter-file can contain multiple YAML documents separated
by ---. Each document is treated as an independent set of overrides
applied to all scenarios in the .osc file, producing
N scenarios × M documents total runs.
# document 0
first_scenario:
  object_goal_pos:
    x: 0.3
    y: 0.6
second_scenario:
  object_goal_pos:
    x: 0.6
    y: 0.3
---
# document 1
first_scenario:
  object_goal_pos:
    x: 0.1
    y: 0.6
second_scenario:
  object_goal_pos:
    x: 0.6
    y: 0.1
With 2 scenarios and 2 override documents this yields 4 runs:
Scenario name |
Override document |
|---|---|
|
document 0 |
|
document 0 |
|
document 1 |
|
document 1 |
The -<index> suffix is appended automatically when more than one document
is present; with a single document names stay as defined in the .osc file.
All results are written as separate <testcase> entries in test.xml.
Behavior tree status log
--bt-log records how the behavior tree progressed over time to
<output-dir>/behaviors.jsonl. It works the same with and without ROS 2 and needs no
middleware. --output-dir is required. How it is implemented is described under
Behavior Tree Status Log.
The file is JSON Lines — one JSON object per line, each complete
in itself, so reading it is one json.loads per line with no state to carry and no join:
{"format":"behavior_tree_log","version":1,"scenario":"demo","scenario_file":"/scenarios/demo.osc","scenario_sha256":"e175a753…","tick_period":0.1,"clock":"SimulationClock","py_trees":"2.4.0","started_at":"2026-08-06T09:14:22Z"}
{"timestamp":0.0,"behavior_id":"0f2b1d8c-…","parent_id":null,"child_index":null,"behavior_name":"demo","class_name":"py_trees.composites.Sequence","type":"SEQUENCE","additional_detail":"","status":"INVALID","feedback_message":"","is_active":false,"tip_id":null,"osc_file":"/scenarios/demo.osc","osc_line":3,"osc_column":0}
{"timestamp":0.1,"behavior_id":"0f2b1d8c-…","parent_id":null,"child_index":null,"behavior_name":"demo","class_name":"py_trees.composites.Sequence","type":"SEQUENCE","additional_detail":"","status":"RUNNING","feedback_message":"","is_active":true,"tip_id":"e5182a6f-…","osc_file":"/scenarios/demo.osc","osc_line":3,"osc_column":0}
Line 1 is the metadata record, recognizable by its format key: which scenario file was
run and its SHA-256, the tick period, which clock timestamp came from, and the py_trees
version.
The following lines describe one behavior each. Before the first tick, every node in the
tree is written once at timestamp 0 with status INVALID; afterwards a line is added
whenever a behavior's status changes. feedback_message is captured at that moment but
does not itself trigger a line.
Because the initial snapshot covers the whole tree, the structure and the state at any point in time can be reconstructed from the file alone, including branches that never executed.
Field |
Description |
|---|---|
|
Seconds since the scenario started. Simulated time when a clock is available ( |
|
py_trees' own UUIDs. |
|
Position among the parent's children, |
|
Name given on construction, and the fully qualified class. |
|
|
|
Extra information about the node, e.g. a parallel's policy. |
|
|
|
The behavior's feedback message at that moment. |
|
Whether the behavior was traversed by the tick that produced this record. |
|
The behavior that determined this subtree's status (py_trees' |
|
Where the behavior came from in the scenario source. The file is per record because an imported |
|
Present and |
Records are flushed as they are written, so a scenario that is aborted or times out still leaves a readable file up to that point.
Tick and action timing
--tick-log records how fast the behavior tree actually ticked, and where the time inside a
tick went. It works the same with and without ROS 2 and needs no middleware. --output-dir
is required. It is independent of --bt-log: either can be used alone.
Two questions, in order. Was the tick rate held? tick_timing.csv has one row per tick,
with the interval since the previous tick and the period that was configured, so
interval_s / period_s is the achieved-against-intended ratio — dimensionless, and therefore
comparable between a fast and a slow machine. If it was not, where did the time go?
action_timing.csv has one row per timed call, so a long tick can be attributed to the
behavior that spent it. That second file is just as useful on its own, to find out which action
in a scenario is slow.
Only timing is recorded; no processor or memory usage is measured.
tick,wall_ts,timestamp,interval_s,duration_s,period_s,driver
87,1756450010.411000,10.408000,0.107000,0.023000,0.100000,ros_timer
88,1756450010.512000,10.509000,0.101000,0.417000,0.100000,ros_timer
89,1756450010.933000,10.930000,0.421000,0.004000,0.100000,ros_timer
Field |
Description |
|---|---|
|
Tick number, counting from 1. Joins the two files. |
|
Seconds since the epoch, advanced by a monotonic clock so that a step of the system clock during a run cannot make the series go backwards. |
|
Seconds since the scenario started, with exactly the meaning it has in |
|
Seconds since the previous tick started. Empty on the first tick, where there is no previous tick to measure against. |
|
Seconds spent inside this tick. |
|
The configured tick period this tick was aiming for. Carried on every row so a ratio needs no lookup elsewhere. |
|
What ticked the tree: |
tick,wall_ts,timestamp,behavior_id,behavior_name,class_name,phase,duration_s,status
87,1756450010.411000,10.408000,c204…,spawn_walker,…GazeboSpawnActor,execute,0.018000,INVALID
88,1756450010.512000,10.509000,c204…,spawn_walker,…GazeboSpawnActor,update,0.414100,RUNNING
88,1756450010.512000,10.509000,a17e…,drive_to_kitchen,…NavigateToPose,update,0.002100,RUNNING
Field |
Description |
|---|---|
|
The tick this call belongs to. Empty for a call made before the first tick, which is where bring-up |
|
The moment of the tick this call belongs to, on the same two clocks as |
|
Identity, spelled exactly as |
|
|
|
Seconds spent in this call. |
|
The behavior's status after the call. |
Every leaf of the tree is recorded, not only the actions from the action libraries — a
wait elapsed() and an emit are behaviors too, and leaving them out would attribute their
time to nothing. Composites are left out: they route ticks rather than do work.
Reading the two files together, a tick whose duration_s is large with action_timing rows
summing to most of it is time spent inside the tick, by a behavior these name. A large
interval_s where the previous tick was short and no rows account for the gap is time that
passed between ticks, with nothing running.
A summary is logged at the end of the run, and the same summary can be printed later from the files alone:
python -m scenario_execution.tick_report <output-dir>
If behaviors.jsonl is present it is used to name the .osc file and line a slow behavior
came from; without it everything else still works.
Rows are buffered and written about once per second, so a scenario that is aborted keeps everything up to the last flush.
Per-scenario output directories
When more than one scenario is executed (multiple scenario blocks in the .osc file,
or multiple YAML documents in --scenario-parameter-file), each scenario automatically
gets its own subdirectory inside --output-dir. The subdirectory is named after the
scenario (including any -<idx> suffix for multi-document runs).
<output-dir>/
   first_scenario/          # output for scenario "first_scenario"
   second_scenario/         # output for scenario "second_scenario"
   test.xml            # combined results (default)
The subdirectory name can be overridden per scenario via the special _output_dir key
inside the --scenario-parameter-file. Relative values are resolved relative to
--output-dir; absolute values are used as-is (and no existing files are removed).
test_scenario:
  _output_dir: my_custom_dir      # → <output-dir>/my_custom_dir/
  object_goal_pos:
    x: 0.3
    y: 0.6
test_scenario2:
  _output_dir: /tmp/test2_out     # absolute path, used directly
  object_goal_pos:
    x: 0.6
    y: 0.3
Note
Relative _output_dir paths must not start with .. (i.e. they must not
escape the root --output-dir).
Per-scenario test.xml
By default a single combined <output-dir>/test.xml is written.
Pass --output-result-per-scenario to write one test.xml per scenario
subdirectory instead:
<output-dir>/
   first_scenario/
      test.xml         # result of "first_scenario" only
   second_scenario/
      test.xml         # result of "second_scenario" only
                       # no combined test.xml at root level
Step-based simulation
Scenario Execution supports running scenarios against step-based simulators (e.g. MuJoCo, PyBullet, custom hardware-in-the-loop).
In step-based mode the framework drives the loop: it calls simulation.step() once per behavior-tree tick, advances a SimulationClock, and then ticks the behavior tree. There is no time.sleep() — the scenario runs as fast as the simulator allows.
Implementing a SimulationInterface
Create a class that inherits from SimulationInterface and implement its abstract methods:
# my_pkg/my_sim.py
from scenario_execution import SimulationInterface

class MySimulation(SimulationInterface):

    @property
    def dt(self) -> float:
        """Duration of one simulation step in seconds."""
        return 0.002  # 500 Hz

    def setup(self, **kwargs) -> None:
        """Called once before any scenario runs. Load worlds, connect to
        simulator processes, allocate resources here."""
        import mujoco
        self._model = mujoco.MjModel.from_xml_path("robot.xml")
        self._data = mujoco.MjData(self._model)

    def reset(self, object_start_x=0.0, object_start_y=0.0) -> None:
        """Called before each scenario. OSC parameters with matching names
        are injected automatically as keyword arguments."""
        import mujoco
        mujoco.mj_resetData(self._model, self._data)
        self._data.qpos[:2] = [object_start_x, object_start_y]

    def step(self) -> None:
        """Advance the simulation by one timestep (dt seconds).
        Must be non-blocking."""
        import mujoco
        mujoco.mj_step(self._model, self._data)

    def shutdown(self) -> None:
        """Called once after all scenarios complete."""
        self._model = None
        self._data = None
Passing scenario parameters to the simulation
Declare the OSC parameters you need directly as arguments on your reset()
override. The framework matches argument names to OSC parameter names and
injects values automatically:
scenario my_scenario:
    object_start_x: float = 0.0   # metres
    object_start_y: float = 0.0
    object_mass:    float = 1.0   # kg (not consumed by reset)

action my_scenario.run():
    do serial:
        wait elapsed(5.0s)
def reset(self, object_start_x, object_start_y, gravity=9.81):
    # object_start_x / object_start_y injected from OSC
    # gravity uses its Python default because it is not in the scenario
    ...
Required arguments (no default) that are absent from the scenario file cause
a clear error before reset() is ever called. Optional arguments (with
defaults) are passed when the scenario declares them, otherwise the default
is used. Struct parameters are passed as nested dictionaries.
If a --scenario-parameter-file is supplied the overridden values are
applied before reset() is called.
The SimulationInterface lifecycle is aligned with the
ros-simulation/simulation_interfaces standard:
|
|
|---|---|
|
Load world + simulator launch |
|
|
|
|
|
|
Running a scenario with a simulation
Pass the --simulation flag with the fully-qualified class path:
scenario_execution --simulation my_pkg.my_sim:MySimulation my_scenario.osc
Accessing the simulation from behaviors
Behaviors receive the simulation object via kwargs['simulation'] in their
setup() method — the same pattern as ROS behaviors using kwargs['node']:
from scenario_execution.actions.base_action import BaseAction
import py_trees

class ReadSensor(BaseAction):

    def setup(self, **kwargs):
        self.sim = kwargs['simulation']

    def update(self):
        obs = self.sim.get_observation()
        if obs['done']:
            return py_trees.common.Status.SUCCESS
        return py_trees.common.Status.RUNNING
Time-based waits with simulation clock
The wait elapsed() directive and timeout() modifier automatically use
the SimulationClock when a
simulation is active. No changes to the OSC scenario file are needed:
scenario test:
    do serial:
        wait elapsed(1s)   # counts 1 / dt simulation steps, not wall-clock seconds
Without a simulation interface the clock falls back to system wall-clock time, so existing scenarios continue to work unchanged.
Step-based simulation with the ROS runner
--simulation works with both runners:
scenario_execution(non-ROS): the simulation drives the loop exclusively (run_with_simulation); there is norclpy, so ROS behaviors are unavailable.scenario_execution_ros(ROS): the ROS spin loop additionally tickssimulation.step(), so a step-based simulation runs alongside the ROS behaviors that drive it. This lets a scenario bring up and drive a ROS stack while the simulation advances time. A simulation that publishes/clockbecomes the time source (other nodes runuse_sim_time), and stepping is paced to real time (the pace can be removed for faster-than-real-time runs).With the ROS runner,
setup()/reset()/step()/shutdown()are called per scenario (each scenario runs on its own ROS node), rather thansetup/shutdownonce for the whole file as with the non-ROS runner.